
Arduino Library Proteus
Adding the Arduino library to Proteus 8 lets you test Arduino projects without a real board. This guide shows simple steps. First, download the library. Then, unzip it. Next, copy it to the correct Proteus folder. Finally, check it by adding an Arduino board in Proteus. Anyone can follow these steps with ease.
Why Add Arduino Library
Proteus does not have all Arduino boards by default. Adding the library lets you use Uno, Mega, Nano, and more. You can also test sensors, LEDs, motors, and other devices. This makes learning Arduino faster and safer.
Main Benefits
- Test Arduino code without a physical board.
- Simulate sensors and outputs easily.
- Save time and avoid hardware mistakes.
- Learn Arduino programming safely.
- Build and test prototypes quickly.
Tools Needed
- Proteus 8 Professional installed.
- Arduino IDE for writing sketches.
- Arduino library ZIP file for Proteus.
- Basic file explorer knowledge.
- Optional: backup of existing library folder.
Step 1: Download Library
Download the Arduino Proteus library from a safe source. Use this Google Drive link. Make sure the file downloads completely. Save it in a folder you can easily access.
Step 2: Unzip File
After download, unzip the file. Use Windows built-in extractor or WinRAR. Keep the folder structure as it is. Do not rename files inside.
Step 3: Copy Files
Select all files in the unzipped folder. Right-click and choose copy. Only copy the needed files. Extra files may cause errors.
Step 4: Find Library Folder
Proteus library folder can be in two places:
Case 1: Program Files
Look at C:\Program Files (x86)\Labcenter Electronics\Proteus 8 Professional\Library. Paste files here if it exists.
Case 2: ProgramData
If not, check C:\ProgramData\Labcenter Electronics\Proteus 8 Professional\Library. Paste the files here. Make sure you have administrator rights.
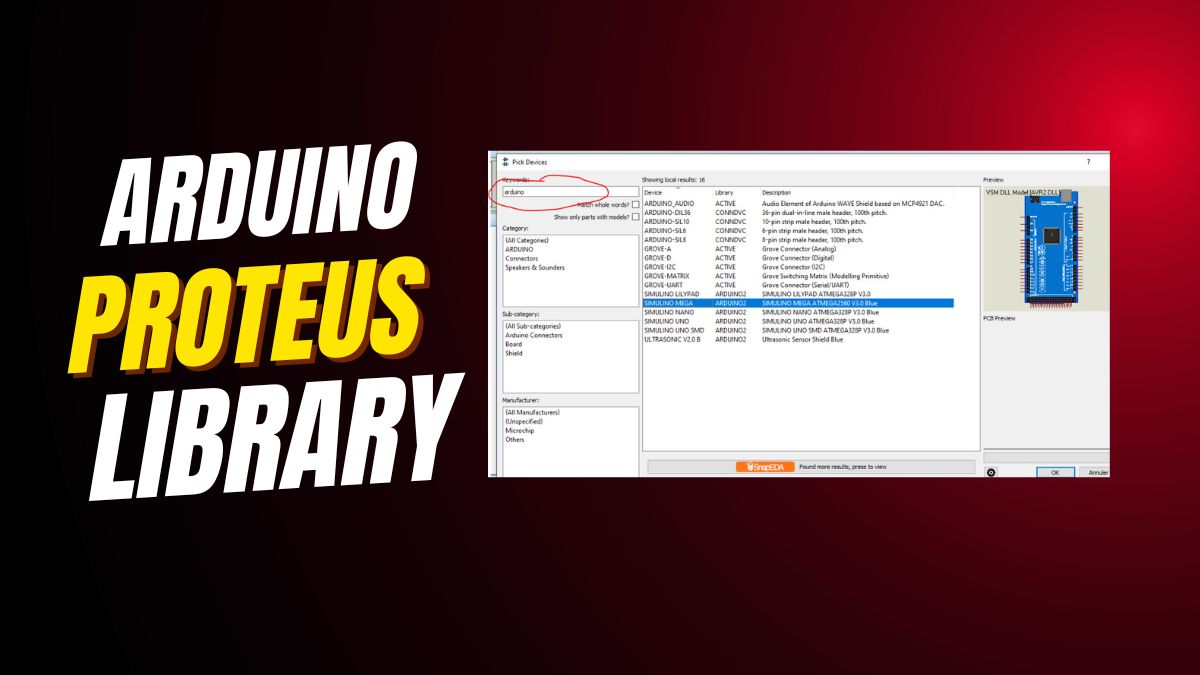
Step 5: Check Installation
Open Proteus 8. Click Components. Type Arduino in search. You should see Uno, Mega, Nano, and other boards. This means the library works.
Add Arduino Board
Click the board you want. Place it in the schematic. Connect sensors, LEDs, or motors. Write your Arduino sketch. Run the simulation. Check for errors and adjust connections if needed.
Tips for Beginners
- Backup library folder before adding new files.
- Use latest Arduino IDE for compatibility.
- Check file paths carefully to avoid missing components.
- Test a simple LED project first.
- Keep libraries organized for future use.
Common Problems
Missing Boards
If boards do not appear, check folder path. Restart Proteus after pasting files.
Simulation Errors
Errors happen if ZIP files are incomplete. Re-download and re-extract files. Keep file names simple without extra spaces.
Permission Issues
You may need admin rights to paste files. Run File Explorer as administrator and then copy files.
Conclusion
Adding the Arduino library to Proteus 8 is simple. Download, unzip, copy, paste, and check. Then you can simulate Arduino projects safely. You save time and learn faster. Experiment with boards, sensors, and sketches easily.
If you’re working on ESP32 simulations, you may find this ESP32 Proteus tutorial useful for setting up and testing your circuits virtually. Also, if you’ve ever struggled to locate the missing library folders in Proteus, this guide on how to find the Proteus library folder easily will save you time. For those comparing microcontroller boards, check out this detailed breakdown of the differences between Arduino and Elegoo: Which one to buy in 2025. And if you’re still deciding which model fits your project needs best, this comparison guide on the right Arduino-compatible board offers a simple explanation to help you choose confidently.


Leave a Reply